Budget Building a Small Hoop House
 The springs here in Seattle aren’t all that warm. Especially for growing things like tomatoes, Indian eggplants, lemon cukes, peppers, and similar hot loving plants that we all love to start early in the season. This season I started plenty of seeds early in the basement. Using readily available lighting in the 5000 Kelvin range from the local Home Improvement Box Store (Sylvania fluorescent tubes in a shop light) I set off.
The seeds were planted weeks and weeks ago in cell packs using a mixture of seed starting media that the recipe can be found here on the site as well. There’s many ways to make a soilless medium. You don’t want to use dirt because you are opening yourself up to all sorts of insect and fungal issues.
Once the plants get going well you an start fertilizing them when they get their first leaves going. A mild mix of any of your favorite balanced liquid fertilizers will work. As an alternative there are many slow release fertilizers on the market in chemical form such as Osmocote which is what I prefer when not using organic fertilizers. It is easy to use and works well especially for potted seedlings and starts.
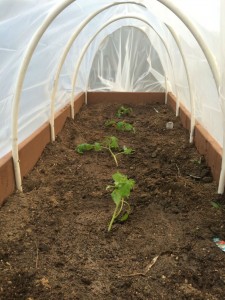
The grow boxes we already were using to keep the kids from riding their bikes over the garden areas. They are 8 feet long by about 3 feet wide roughly. Scraps left over from our remodel that were put to good use. the hoop parts are PVC pipe that is readily available from hardware centers around the world. I don’t like drinking water piped through PVC but I don’t mind using it as a hoop for the hoop house.
I used 2 1/2″ deck screws from Ace Hardwares bulk screw and nail bins. They are cheaper that way. The pipes that I used were cut to about 6 feet for some other project so that’s the length that I used as I already had them available. I put one end on one side and slowly bent them to fit inside the base of the garden box. I adjusted the depth to make the arches all the same height and put two screws in each end on opposing sides of the box. I felt that 5 PVC pipes were the best for me so that’s what I did. Different lengths might do better with more or less PVC ribs.
After I had all my PVC ribs in place and screwed into place I laid out my plastic and used the PVC clips made for 1/2 inch PVC. The clips are available online and make attaching poly sheeting to PVC literally a snap. If you mess up simply take the clip off, readjust, and get back to what you were doing. It also makes it easy to take it down for the winter or move it.
The ends are always the weird part. I pulled the sides and folded them slightly to the middle. The pictures don’t show it but I trimmed the length so that the middle portion folds down, and the two sides fold over that. there are several options to hold the sides taught. The ends can be tied in a know like pictured, or they can be fastened otherwise. A short piece of PVC pipe and a clip will work. Simply screw a short section of PVC to the lip of the planter box. Pull the plastic over the pipe and put a clip on it. Elastic or bungee cords can also be used in the same method.
When the warm days of late spring and summer finally do come the plastic can be put away and stored to avoid the excessive heat that summer might bring. Come fall when temps cool down again you can dig out the poly sheeting and reapply it to the ribs. During the summer the ribs can be left intact so that you can fasten your tomatoes and peppers to them as a support.
Getting an early and late go at gardening doesn’t have to be difficult or expensive if you are thrifty and forward thinking. Starts planted out early can get a head start so that they produce for a longer season. In this economy and with the cardboard vegetable offerings at the grocers every tasty bit counts.
 Hobby Poultry A Chicken in Every Yard


