 Hobby Poultry A Chicken in Every Yard
 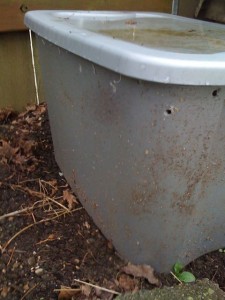 Making a Worm Bin for Worms and Compost
Vermiculture is a practice of using worms to make compost. The end result from food scraps is less trash, more fertilizer, and worms. You can use the compost for plants, worm castings for fertilizer, and worms for more composting.
A plastic storage tote makes and excellent worm bin that can be brought into the garage in the dead of winter when freezing temperatures may harm your worms. A 10 to 20 gallon tote will be ample for most uses. If you have more waste or need more compost then more containers can be used.
Holes are drilled into the bottom of the container to allow for proper drainage so that your worms don’t drown should it rain. The holes should be spaced evenly a couple inches apart throughout the bottom. Along the top edge do the same. Two rows about an inch down from the top shoud suffice. You can also drill holes in the top. If using it outside you may want to omit holes in the lid that may fill your tote with water. I have two small holes in the top to allow some water in. I have mine slightly off level so that only a nominal amount of water can get into the holes. The rest of any rain water runs off the top. I did this to keep my bin from drying out completely.
On the bottom of the bin a layer of sawdust, paper, cardboard or similar is added. I use light layers of dirt as a base to start with no more than three or four inches. The rest is sawdust and food to be broken down. The sawdust or newspaper should be wet and squeezed dry, or lightly damped well. The compost will need moisture for breaking down and also for the worms to live in.
You can put the worms in the compost bin now. If you plan on keeping your worm bin outside place it in a shady spot. If you keep it inside you can use the lid as a catch tray for anything that drips through. It is best to elevate the bin so that it can get air. I prefer to keep mine outside. I buried mine up to the lid and covered it with leaves and straw. It seem sto have overwintered well but I think that it produces more in the warm basement or garage.
If your bin is smelly you have too much organic material in it. Try slowing down on the banana peels and other food scraps for a few days until the worms catch up. The thing with worms is that they will eventually catch up to your supply by creating new worms. It is the beginning that you have to moderate a little if you happen to have a problem.
After the food is broken down and you want worm dirt you can either brush or move all the old compost to one side and start again with a half bin or you can take off the non-composted top and start a new bin with that. Generally the worms will go where the food is. Taking the top layer and starting a new bin is the fastest. Moving and starting a second pile in the worm bin will take a day or two as they worms move over to eat. You can start the second pile method before you know you want to use the worm casting compost.
You can use the worm casting compost directly or you can put it in a container and drain water through it for liquid fertilizer. Either way works.
If you like you can add compost to soil that you already have for potting plants or for fertilizing. Straight compost can also be used for plants. To better suit your soil for your plants you can use several amendments like pine bark, sand, or coconut fiber. There is another article on DIYSeattle about making your own potting soil.
By composting with worms you reduce your amount of trash that throw out in the wastebasket or run down the drain in the garbage disposal. You also gain fertilizer, compost, and worms. It is an environmental way to save a few dollars and save a little on the impact we have on the ecosystem.